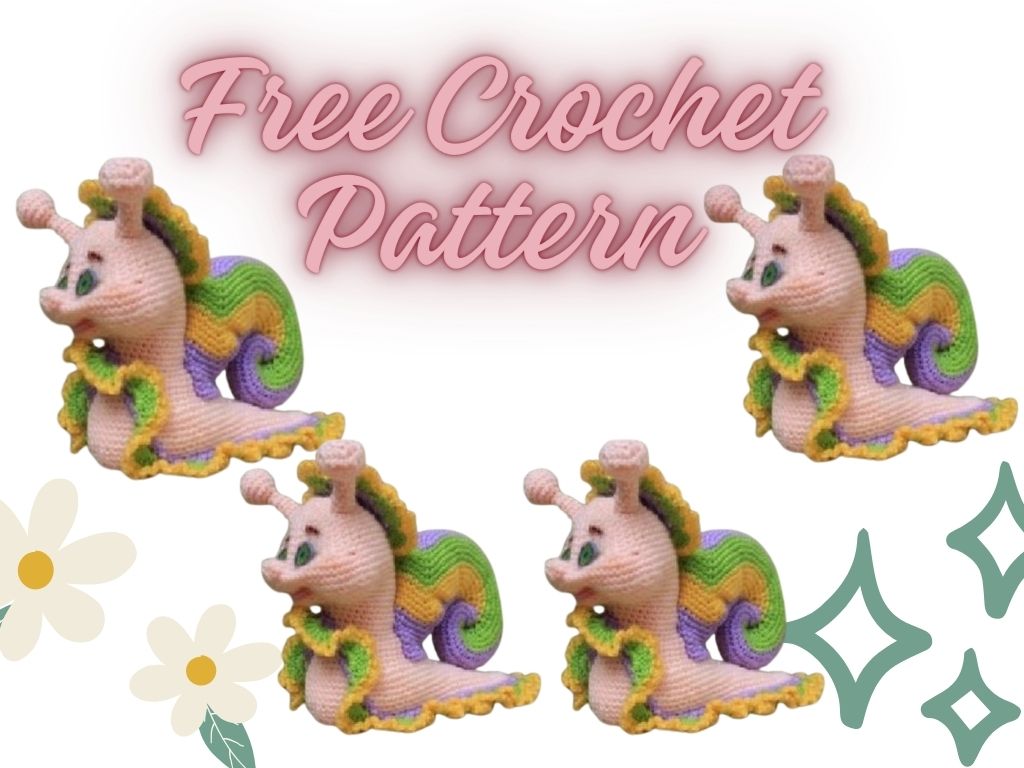
Hello dear Amigurumi Knitting Lovers
Today we share a free amigurumi crochet pattern for you. As you know, we share new amigurumi free patterns every day. master crochets, amigurumi gazelles, amigurumi bears, amigurumi pola, amigurumi pandas, amigurumi penguins, amigurumi giraffes, amigurumi lama, amigurumi pigs, amigurumi rabbit, amigurumi clowns, amigurumi dolls, amigurumi unicorn, amigurumi elephants, amigurumi unicorn , amigurumi hippos, amigurumi monkeys, amigurumi cats, amigurumi dogs and more…
Today, the new daily crochet pattern Amigurumi, Amigurumi Snail Free Crochet Pattern Crochet Pattern, I want to give you some information about this pattern;

sc – single crochet
ch – air loop
pp – lifting loop
sl-st – connecting post
stb – column
hdc – half double crochet
inc – inc increase (2 sc in one loop)
dec – decavka (2 sc together)
incop. – incomit
EYE (2 pcs)
1) 6 sc (6)
2) inc X6 (12)
3) (1 sc, inc) X6 (18)
HEAD AND BODY
1) 6 sc (6)
2) inc X6 (12)
3) (1 sc, inc) X6 (18)
4) (2 sc, inc) X6 (24)
5) (3 sc, inc) X6 (30)
6) (4 sc, inc) X6 (36)
7) (5 sc, inc) X6 (42)
8) (6 sc, inc) X6 (48)
9) 48 sc (48)
10) 48 sc (48)
11) (7 sc, inc) X6 (54)
12) 54 sc (54)
13) (8 sc, inc) X6 (60)
14) 60 sc (60)
15) 60 sc (60)
16) (9 sc, inc) X6 (66)
17) 5 sc, (1 sc, inc)X5, 36 sc, (1 sc, inc)X5, 5 sc (76)
18) 76 sc (76)
19) 29 sc, (dec, 1 sc)X3, (1 sc, dec)X3, 29 sc (70)
20) dec, 66 sc, dec (68)
21) 68 sc (68)
22) dec, 64 sc, dec (66)
23) 66 sc (66)
24) 66 sc (66)
25) (9 sc, dec) X6 (60)
26) 60 sc (60)
27) (8 sc, dec) X6 (54)
28) (7 sc, dec) X6 (48)
29) (6 sc, dec) X6 (42)
30) (5 sc, dec) X6 (36)
And then I burst in!
Girls and maybe boys!
If you will be using safety eyes, now is the time to use them.
insert, that’s why I moved my eyes first. But for the eyes first
it is necessary to make tightenings, and then also tie the eyelid. Make tightenings
based on the photo.

And now I confess and repent: I’m lazy! And everything about incision
details to their rightful places – brings me indescribable sadness! That’s why,
so as not to first sew the eyelid in half, and then it with the eye, or so as not to
incising the eye first, and then not incising the eyelid above it, I was thinking about this
what: knit the first 3 rows of the eyelid according to the pattern, then fold the eyelid in half and
incly knit both edges of the eyelid and the last row of the eye together according to the pattern – insibavka
(here you will have to get a little involved and knit the first sc of the 4th row and
last sc of the 3rd row together), 3 sc, increment, 3 sc, increment. Our total
it will still be the same 12 columns, but the eyelid will already be close to the eye)
EYELID
1) 6 sc (6)
2) inc X6 (12)
3) (1 sc, inc) X6 (18)
4) (2 sc, inc) X6 (24)
4)* fold in half and knit, grabbing both edges and the last
row of eye details: inc, 3 sc, inc, 3 sc, inc (12)
* my version
Sew your eyes, focusing on the photo, insert safe eyes.

If you don’t use safety peepholes, with the design of your face
You can wait.
31) 36 sc (36)
32) 36 sc (36)
33) 36 sc (36)
34) (5 sc, inc) X6 (42)
35) 42 sc (42)
36) 42 sc (42)
37) 42 sc (42)
38) (6 sc, inc) X6 (48)
39) 48 sc (48)
40) 48 sc (48)
41) 48 sc (48)
42) (7 sc, inc) X6 (54)
43) 54 sc (54)
44) 54 sc (54)
45) (7 sc, dec) X6 (48)
46) 48 sc (48)
47) (6 sc, dec) X6 (42)
48) (5 sc, dec) X6 (36)
49) (4 sc, dec) X6 (30)
50) (3 sc, dec) X6 (24)
51) (2 sc, dec) X6 (18)
52) (1 sc, dec) X6 (12)
53) dec X6 (6)

TAIL
1) 4 sc (4)
2) (1 sc, inc) X2 (6)
3) (2 sc, inc) X2 (8)
4) (3 sc, inc) X2 (10)
5) (4 sc, inc) X2 (12)
6) (5 sc, inc) X2 (14)
7) (6 sc, inc) X2 (16)
8) (7 sc, inc) X2 (18)
9) (8 sc, inc) X2 (20)
10) (9 sc, inc) X2 (22)
11) (10 sc, inc) X2 (24)
12) (11 sc, inc) X2 (26)
13) (12 sc, inc) X2 (28)
14) (13 sc, inc) X2 (30)
15) (14 sc, inc) X2 (32)
16) (15 sc, inc) X2 (34)
17) (16 sc, inc) X2 (36)
18) (17 sc, inc) X2 (38)
19) (18 sc, inc) X2 (40)
20) (19 sc, inc) X2 (42)
21) (20 sc, inc) X2 (44)
22) 44 sc (44)
23) (21 sc, inc) X2 sc (46)
24) 46 sc (46)
25) 46 sc (46)
26) (22 sc, inc) X2 (48)
27) 48 sc (48)
28) 48 sc (48)
29) 48 sc (48)
30) 48 sc (48)
31) 48 sc (48)
32) 48 sc (48)

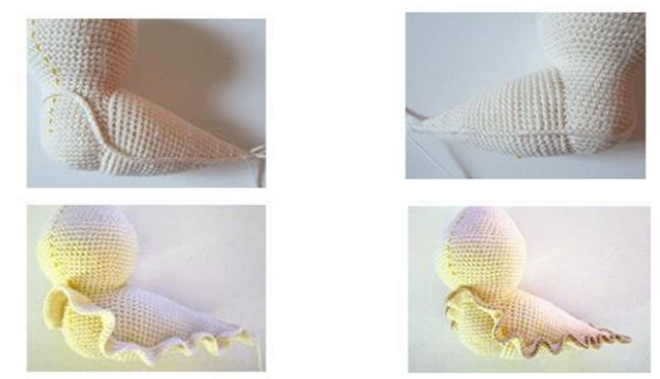
Stuff the tail and sew it to the body as shown in the picture.

Use pins to mark the place for knitting, let’s call it fringes.
Then tie the connecting pieces around the intended line
columns starting from the tip of the tail.
And again in the arena my Laziness!) With this method of inco-tying
I personally have huge incproblems – it turns out with great
labor and nerves. Therefore, intending to sheathe the intended
chain stitch line. To make it more convenient, it’s better to take
ribbon embroidery needle or tapestry needle.

Next, knit 2 sc into each loop. 2nd and 3rd rows – 1 sc each
in each loop, change the thread and knit the 4th row in contrast
in color, also 1 sc per loop.
The description says to knit in single crochet stitches, but I…
for some reason it seems that there should be half columns with
yarn over
NOSE
1) 6 sc (6)
2) inc X6 (12)
3) 12 sc (12)
4) 12 sc (12)
5) (3 sc, dec) X2 (10)
HORNS
1) 6 sc (6)
2) inc X6 (12)
3) 12 sc (12)
4) 12 sc (12)
Stuff it a little
5) dec) X6 (6)
6) 6 sc (6)
7) 6 sc (6)
8) 6 sc (6)
9) 6 sc (6)
10) 6 sc (6)
11) sc, inc) X2 (8)
12) 8 sc (8)
13) 8 sc (8)
14) (3 sc, inc) X2 (10)
15) 10 sc (10)
16) (4 sc, inc) X2 (12)
17) (5 sc, inc) X2 (14)

SINK (2 pcs)
1) 4sc (4)
2) (1 sc, inc) X2 (6)
3) 6 sc (6)
4) (2 sc, inc) X2 (8)
5) 8 sc (8)
6) 8 sc (8)
7) (3 sc, inc) X2 (10)
8) 2 sl-st, 8 sc (10)
9) 2 sl-st, 8 sc (10)
10) (4 sc, inc) X2 (12)
11) 2 sl-st, 10 sc (12)
12) 2 sl-st, 10 sc (12)
13) (5 sc, inc) X2 (14)
14) 3 sl-st, 11 sc (14)
15) 3 sl-st, 11 sc (14)
16) 3 sl-st, 11 sc (14)
17) (6 sc, inc) X2 (16)
18) 3 sl-st, 13 sc (16)
19) 3 sl-st, 13 sc (16)
20) 3 sl-st, 13 sc (16)
21) (7 sc, inc) X2 (18)
22) 4 sl-st, 14 sc (18)
23) 4 sl-st, 14 sc (18)
24) 4 sl-st, 14 sc (18)
25) (8 sc, inc) X2 (20)
26) 5 sl-st, 15 sc (20)
27) 5 sl-st, 15 sc (20)
28) 5 sl-st, 15 sc (20)
29) 5 sl-st, 15 sc (20)
30) (9 sc, inc) X2 (22)
31) 6 sl-st, 16 sc (22)
32) 6 sl-st, 16 sc (22)
33) 6 sl-st, 16 sc (22)
34) 6 sl-st, 16 sc (22)
35) 6 sl-st, 16 sc (22)
36) (10 sc, inc) X2 (24)
37) 6 sl-st, 18 sc (24)
38) 6 sl-st, 18 sc (24)
39) 6 sl-st, 18 sc (24)
40) 6 sl-st, 18 sc (24)
41) 6 sl-st, 18 sc (24)
42) 6 sl-st, 18 sc (24)
43) (11 sc, inc) X2 (26)
44) 7 sl-st, 19 sc (26)
45) 7 sl-st, 19 sc (26)
46) 7 sl-st, 19 sc (26)
47) 7 sl-st, 19 sc (26)
48) 7 sl-st, 19 sc (26)
49) 7 sl-st, 19 sc (26)
50) 7 sl-st, 19 sc (26)
51) (12 sc, inc) X2 (28)
52) – 61) 8 sl-st, 20 sc (28)
62) (13 sc, inc) X2 (30)
63) – 72) 8 sl-st, 22 sc
73) – 82) 10 sl-st, 20 sc (30)
83) 30 sc (30)
84) 30 sc (30)
85) 30 sc (30)
86) 30 sc (30)
87) 30 sc (30)

BERET
1) 6 sc (6)
2) inc X6 (12)
3) (1 sc, inc) X6 (18)
4) (2 sc, inc) X6 (24)
5) (3 sc, inc) X6 (30)
6) (4 sc, inc) X6 (36)
7) (5 sc, inc) X6 (42)
8) (6 sc, inc) X6 (48)
9) 48 sc (48)
10) 48 sc (48)
11) 48 sc (48)
30) (6 sc, dec) X6 (42)
32) (5 sc, dec) X6 (36)
33) 36 sc for the back half loop (36)
34) 36 sc (36)
35) 36 sc (36)
36) 36 sc (36)
Fasten the thread in the center of the beret, 11 ch, from the second loop from the 10 sc hook
EASEL
RACKS (4 pcs)
Inside each part insert a frame (incovolok, ice cream flat, cotton
stick, etc.)
1) 6 sc (6)
2) inc X6 (12)
3) – 27) 8 sc (8)
28) dec X4 (2)

BAR
Do not stuff the part
1) 6 sc (6)
2) inc X6 (12)
3) – 19) 12 sc (12)
28) dec X6 (6)

İncconnect the thread in the middle of the stand, 15 ch, sl-st in the middle of the second stand, 15 ch, sl-st in the middle of the third stand. Make sure that the chain of ch is not twisted. It turns out to be a tripod.

SMALL CANVAS
1) 21 ch, with loop side from hook 20 sc (20)
Knit in side rows 16 rows of 20 sc
LARGE CANVAS
1) 26 ch, with loop side from hook 25 sc (25)
Knit in side rows 18 rows of 20 sc
Embroider any design.

BRUSH STICK
1) 4 sc (4)
2) (1 sc, inc) X2 (6)
4) – 23) 6 sc (6)
24) (2 sc, inc) X2 (8)
25) 8 sc (8)
26) 8 sc (8)
27) 8 sc (8)
28) (2 sc, dec) X2 (6)
29) 6 sc (6)
BRUSH
1) 4 sc (4)
2) (1 sc, inc) X2 (6)
3) inc X6 (12)
4) 12 sc (12)
5) 12 sc (12)
6) 12 sc (12)
7) (4 sc, dec) X2 (10)
8) (3 sc, dec) X2 (8)
9) (2 sc, dec) X2 (6)
10) (1 sc, dec) X2 (4)
11) 4 sc (4)

BUCKET OF PAINT
1) 6 sc (6)
2) inc X6 (12)
3) (1 sc, inc) X6 (18)
4) (2 sc, inc) X6 (24)
5) – 10) 20 sc (20)
10) (1 sc, dec) X2 (4)
DYE
1) 5 sc (10)
2) inc X5 (10)
3) (3 sc, inc) X3 (15)
4) 15 sc (15)
5) 15 sc (15)
6) (3 sc, dec) X3 (12)
For the handle of the bucket, inc connect the thread in the middle of the bucket, 15 ch, sl-st on
in the opposite side of the bucket. Sew the details as shown in the picture.